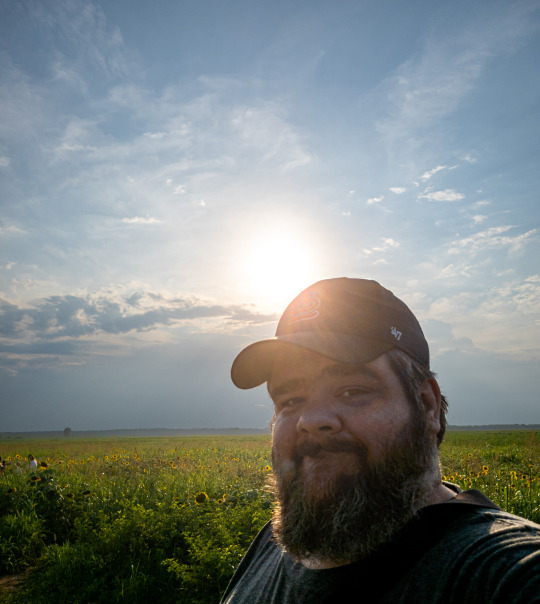
#Processing JPEG images
Explore tagged Tumblr posts
Visit Tumblr Blog
Explore Tumblr blogs with no restrictions, modern design and the best experience.
Last Seen Tumblr Blogs


Fun Fact
Tumblr Inc. has $15.1M in annual revenue.
Text
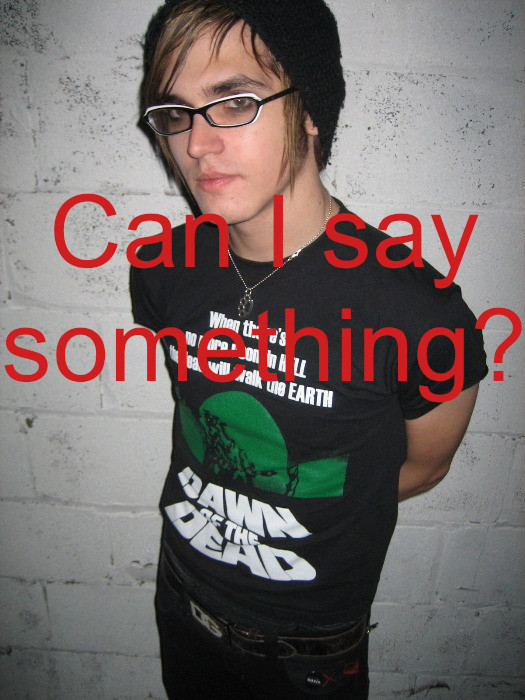
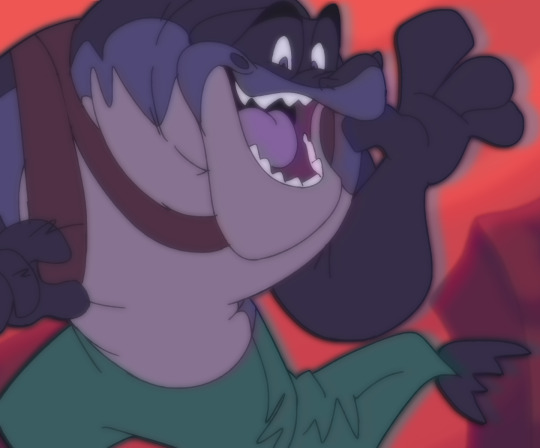
Imagine, for a moment, that your internet just stopped loading images one day. Your dash might look pretty different (and less usable), but at least you can still make posts — whether about your internet situation, or about completely unrelated topics.
Now, imagine that one or more of your posts blew up, to the tune of hundreds if not thousands of notes. Imagine people started adding images to your posts.
Imagine your post circulating almost entirely in the form with four or five images attached, and with everyone in the notes laughing about those images — except you, who started the post in the first place, who can't even see those images because you're trapped in Tumblr's loading gradient hellscape.
You're excluded from any further conversations on your own post, because someone added a mystery image with the caption "don't leave this in the tags," but you have no idea which set of tags it is, and can't tell if it's one of the good takes from the tags or one of the horrible takes from the tags. You're excluded from the Tumblr users playing with JPEGs like dolls. You can try to guess the contents of the images based on people's reactions, but it's hard. And no one adding images even seems to notice the irony.
This is, of course, a real problem plaguing Tumblr users with regularly slow internet. And it's also a huge, insidious problem plaguing blind and low vision people who rely on either screen readers, or image descriptions in combination with enlarged text on their device.
People with disabilities around comprehending images, people who have images (or gifs) disabled due to photosensitivity, and many others are also affected.
If you add an image to a post without either alt text, an in-post image description, or even both for maximal inclusivity, you don't know if OP — or the person whose tags you're peer reviewing, or whose reply you're screenshotting — will actually be able to see it. From their perspective, you might just be shoving a mystery rectangle in their face, expecting them to be able to guess — or responding to them without them being able to know.
Imagine being on the receiving end of that expectation constantly. Imagine how isolating that must feel.
We need, collectively, to stop making assumptions that everyone we interact with online will be able to access, physically see, and mentally process images. The assumption that disabled people are vanishingly rare and statistically shouldn't really need to be considered is an assumption of structural and/or implicit ableism.
Write image descriptions. Write image descriptions for every image you post, if you're able — but if you have limited energy, or you're still learning, you should at least start trying your absolute best to describe images you add to other people's posts. If you're starting a conversation, even an online conversation, you should make your best effort to be accessible.
So: Write IDs, especially if they're as simple as just text, like screenshotted tags (link to guide). Write IDs even if you think the best ID you can write is too short, or too incomplete (link to post explaining why even "bad" IDs help).
Write IDs in general (link to a huge compilation of guides). Challenge ableist assumptions and inaccessibility.
#this is not a callout post or anything - i've actually reminded a few people in my notes about this recently#pointing out the disability flag in my icon - and they've all been very courteous#it's just that the site culture as a whole needs to change. urgently#accessibility#image descriptions
1K notes
·
View notes
Text
late last year I had a dude my dad's age transplant my CPU, GPU and RAM into essentially a whole new chassis complete with all the other shit a PC needs to function and I have many regrets for a variety of reasons, but one baffling thing about the process that I only discovered recently is the wallpapers folder that this man left behind
like, it starts out normally enough,
but. you might notice.

oddities.
let's look at some of them more closely.

I'm not sure what img1 is supposed to convey. Is it supposed to be like, a virus thing? This is a boomer building PCs in a small town so I'm sure he's been paid for basic virus cleanup and maintenance many, many times. This is an EXTREMELY generous guess on my part, though, because there are far more inexplicable things coming.
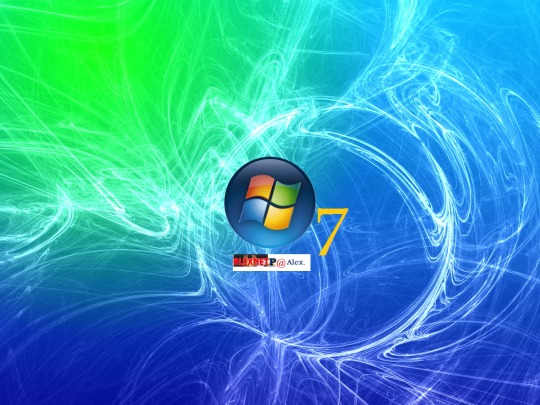
ok this one isn't that weird, I just want you all to know how bad this dude's sense of graphic design is. also wait it IS kind of weird, what's windows 7 doing here??? this man was totally ready to install windows 11 (though when I said I'd rather stay on 10 for now he was like "oh yeah that's smart 11's no good for gamers yet"). that's his logo below the windows logo. I feel like I'm also being generous when I call it a logo.

is this just an intel marketing image that he slapped the name of his business on in MSPaint??? also my CPU's AMD but lbr this man made a "wallpapers" folder a decade ago and he just drags and drops it to every new windows install he's made since

HUH????????
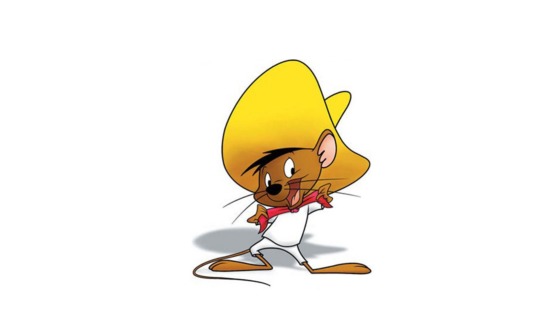
IMG6 IS JUST A BLURRY JPEG OF SPEEDY GONZALES????????? I DON'T wait is it supposed to be like a metaphor. "i made your pc fast, like speedy gonzales, you're welcome"?? is this how the mind of a man in his late 50s works

I. frankly I should have saved this one for last because it doesn't get any more baffling than this, but I've been going in order so it'd feel wrong. this image is the only thing justifying my tentative interpretation of the stickman with the syringes sticking out of it, but that's all I can get from it. I don't know why this man apparently kins Dr. Wily, and the Simpsons, uh. The, the Simpsons,
look I'm going to translate the barely legible text because you might think it helps make sense of what's going on here
daaaaaaaamn it's alex!?! ... he fixed our PC and this is how we ended up !!!
BUT IT DOESN'T.

imgs 08, 09, 10 and 12 are all F1 cars with a crude MSPaint i5 GAMING Intel Racing by Windows 10 on top. I don't need to go over why this makes no sense again.
img11 raises a question, asks it, and in the end, provides no answer.
img13 is just the penguin doctor image from earlier, sans Dr. Wily, so I'm not posting it again. img-- ok no I know what I said earlier about going out of order but I AM going to save img14 for last because otherwise this post is going to end on a wet fart.
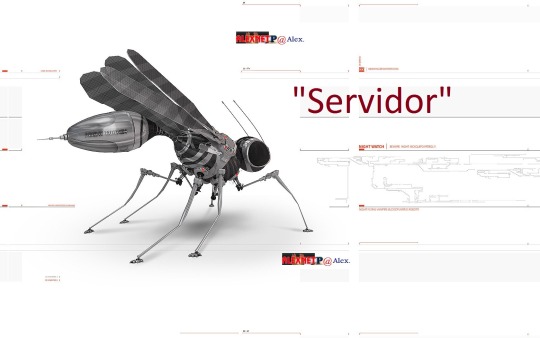
imgs 15 and 19 are identical except he wrote "Servidor" (server) on the latter.


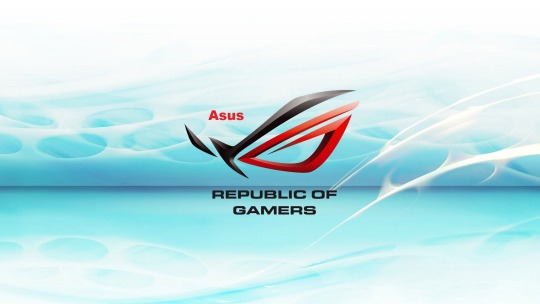
these three i can see actually being MINORLY tailored to my build because my motherboard is Asus, but it isn't ROG, it's TUF and-- christ sorry I just realised he also crudely wrote "Asus" on the last one. that's the only difference between img16 and img18
and finally. left this one for last because I remembered that there IS one image in this folder that baffles me almost as much as "this pc repair job made us get naked, thanks dr. wily"
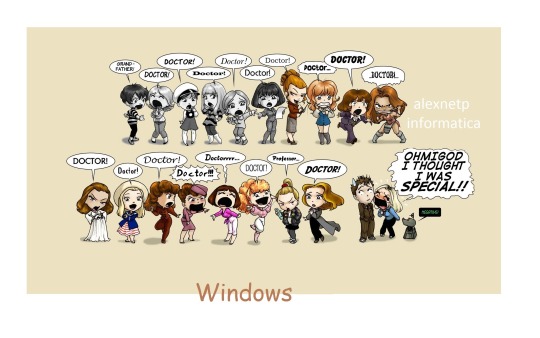
img14 is stolen Doctor Who fanart with the name of this man's business and Windows crudely written on top, and frankly, the second most surprising thing about it is that he didn't ALSO write the name of his business in Comic Sans.
83 notes
·
View notes
Text


Commissions are open on Ca$h app and paypa!l!! If anyone ks interested please DM me! 3/3 slots are currently opened!
Terms of Service
1. You can contact me on discord (aaaabattery), Instagram (crisanto.blooms), Twitter (battsleak) or Tumblr (alkalineleak)! I can't promise I'll respond immediately, but I will try to respond as quickly as possible.
2. I am chronically I'll and experience fatigue, this means that commissions may closed or take a long time to complete. Please be patient and kind.
3. Please be respectful! I will not tolerate rude behavior, and reserve the right to deny or cancel your commission. If this behavior continues, I will block and blacklist you.
4. Do not use my art for any commercial use such as merchandise, book coverage, etc. Profiles and banners are fine since it's personal use, just credit me! The same goes for reposting the art I commissioned, just tag me an or credit me!
5. I reserve the right to post and include all the art I make into my personal portfolio since I still own it. If you don't want the art posted, please tell me and I'll hear you out!
6. Do not submit my art to any AI or AI engine, I do not appreciate my work being stolen and claimed by someone else.
7. Listed prices are the base price, they can increase based on additional details and complexity of the commission.
8. I have every right to deny a commission if I do not meet the skill level required (as to protect customers) or falls under subjects that I will not do.
9. Please provide visual references when commissioning me as it makes my work a lot easier and means I can better fulfill your request and avoid unnecessary mistakes.
10. During the process of commissioning, I will attempt to regularly send updates so that you may request alters or changes. Having to change any major parts of the commission post sketch phase (which I will approve with you) will enquire a fee. Once a piece is past the sketch phase, only minor edits are allowed for free.
11. Do not rush me, but if a commission is time-sensitive, give me two weeks in advance. If you consistently pressure me on completing a commission when I have clearly stated my limits, I reserve the right to cancel or deny a commission.
12. In the rare event that I feel I cannot complete a commission at all, I can give a partial refund depending on how much I've completed. (I will keep 25% of the total cost minimum.)
13. When I am finished, I will message you full res png files of the work, and watermarked .jpegs for social media posting.
FAILURE TO COMPLY WITH A TOS CAN RESULT IN BEING DROPPED, HAVING YOUR COMMISSION CANCELLED OR DENIED, AND BLACKLISTED.
Higher res images of the drawings under the cut


#batterys drawing again#commission#art commissions#dms open#art comms open#art comms info#commisions open#digital commisions#digital illustration#artist comms#comms info#art commisions
119 notes
·
View notes
Text
──────── · · ─ ·𖥸· ─ · · ────────
I bound The Rape of Ganymede by @duchessonfire
──────── · · ─ ·𖥸· ─ · · ────────


──────── · · ─ ·𖥸· ─ · · ────────
This was my first miniature bind, born out of the need to have this one shot in print, even though it’s sadly too short for a normal-sized book. I’m really happy with how it turned out though and learned a lot in the process, so I really can’t wait to try this again.
First, I downloaded the fic, formatted it (I even added this little Ganymede painting just for fun), then exported the doc as a pdf and then converted that pdf into individual jpeg images.
──────── · · ─ ·𖥸· ─ · · ────────


──────── · · ─ ·𖥸· ─ · · ────────
I found this template online and calculated where the page numbers needed to be for it to form proper signatures. The font turned out to be far too small so I had to redo all of what I just described. But after all of that I could finally start sewing the signatures together, cutting the text block, sewing the endbands and last but not least, designing the cover.
──────── · · ─ ·𖥸· ─ · · ────────


──────── · · ─ ·𖥸· ─ · · ────────
I did have to shorten the title, just so it would fit onto the cover. I was also inspired by hawthornandvinebooks. Their rebinds are gorgeous. I really fell in love with Ferrier’s Ganymede, so I half removed the background, printed it on iron-on transfer paper and ironed it onto my book cloth. Adding the htv on top of that can be tricky, as the protective film is sticky and will rip parts of the image off if I’m not careful.
──────── · · ─ ·𖥸· ─ · · ────────
#fanfic binding#negan fanfiction#ao3 fanfic#ao3#fanfiction#fanfic#book binding#bookbinding#cegan#cegan fic#negan smith#negan smut#carl x negan#twd negan#the walking dead negan#negan#ficbinding
83 notes
·
View notes
Note
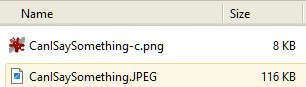
can i ask what tool you use to compress?
also could you perhaps compress this image :)
Compressed!
116KB -> 8KB ( 6.9% )
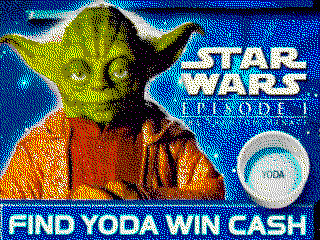
Sure. I'm going to be answering @slugcat-in-gundam's ask too because they sent it at a similar time with a similar question:

I use GIMP for all image editing, besides occasional Lunapic.com usage. I did an FAQ on this on another gimmick blog a while back but I do different things here sometimes so I'll redo it anyways.
I got a higher quality version of your picture so the compression will be more noticable:

All the compression done on this blog favors aesthetics over functions, which is why there's extreme dithering on everything: dithering isn't really something that's used at all anymore but I like how it looks.


The main process is really just scaling the image down with linear interpolation to something between 64-256 pixels on the short side, and using Gimp's feature of letting you clamp an image to indexed colors, specifically with Floyd-Steinberg dithering on. If there isn't dithering, the picture will look like this:

Then I just check the sizes they export at and post the image and that's it.
If I want to make the image comically small and impossible to discern, I'll keep it as a jpeg and turn the quality way down at a tiny size:

Which will end up looking like this.

There are other techniques used sometimes, mainly on the #win98 pictures and #gba pictures.
With the win98 pictures, I scale them down to 320x240 or 160x120 every time and clamp the colors to the windows base palette, usually saturating the image before since the dithering doesn't look great otherwise. Look how this picture looks without vs with extra saturated colors:

I forgot to mention before so I'm just jamming it here, but I'll also replace text in the font 3x3 mono if it's too small to be readable to keep the image legible sometimes. You'll notice this being done with fine print and watermarks sometimes:
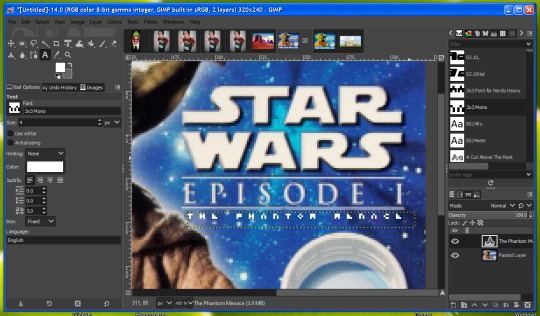
Here's the runthrough of that:


Lastly, with the GBA pictures, it's about the same process but I just clamp the colors down to a number that the dithering is noticeable while the image is at the gba resolution. I never noticed until making this tutorial, but there's a positioned option for dithering too which I'll probably start using for these gba posts.


That's about it. Here's the big version of the image you sent by the way:
92 notes
·
View notes
Note
(stage whisper) how'd you make those pieces look like screenshots? what rules do you use for the lighting/color palette? do you use any sort of filter? please please pls I'd like to learn
I'm not sure what options every program has, but on procreate here's my process:
-work at a high resolution so it doesnt get too crunchy when you intentionally crunch it later
-keep any foreground and background figures on their own layer group for later depth adjustment
-Use a no-pressure, small round brush for lineart to give even lines with no weight variance
-keep colors on figures to flats and shadows, shadows are very light grey set to multiply. In brighter settings, a clipping mask 'add' layer of the light source's colors set to low opacity over the figures can make things pop.
-turn on alpha lock for lineart and use a soft brush to make the lines have a red sheen where light touches most. Then duplicate lineart, gaussian blur the duplicate at a low %, and merge them back together.
-if there are any figures not in focus, blur them now (diff types of blur can be fun here but gaussian works fine for static figures).
-save the whole image as a jpeg and reopen it. -start with a 1% gaussian blur on the whole thing
-open up 'glitch' and select 'diverge', set zoom to 0%, and play around with the shift levels (usually about 15% for the filter lever, and around 10% red shift, 2% others).
-open bloom and play with bloom levels until it feels right (i usually do between 20-30%, max transition, and between 25-40% for size and burn depending on image)
-add a low % noise filter over the whole thing
-1% gaussian blur one more time
-maybe a low % gradient map if you feel like it needs color equalizing
here's what they look like before and after i filter them (but before i crunch the resolution down, which blurs the glitchy bits)
67 notes
·
View notes
Text
Convert HTML to Image: A Step-by-Step Guide ✨

Do you want to turn some HTML code you've made that's on your website and have a way to convert it into an image for you to save?
Well, look no further! I too wanted to do the same thing but funny enough, there weren't any straightforward tutorials out there that could show you how! After hours of searching, I finally discovered the solution~!
This is an old tutorial I made 🐼

💛 Set your environment
Before we dive into the conversion process, I'll assume you already have your HTML code ready. What you want to learn is how to turn it into an image file. You should have a good grasp of HTML and JavaScript. For this tutorial, we'll use the following HTML code example:

We won't include the CSS code, as it doesn't affect this tutorial. The JavaScript file (script.js) at the bottom of the body element is where we'll add the functionality for the conversion.
Your page should resemble the following:

As you can see, the "Click me" button will handle the conversion. We aim to convert everything within the div.info-div into an image.
💛 Using the html2canvas JavaScript Library
The html2canvas library allows you to take screenshots of webpages and target specific elements on a screen. Here are the steps to include the library in your project:
The steps to put the library in your project:
Visit the html2canvas website for more information.
Copy the CDN link from here

and include it in a script tag in your project's head tag in the HTML file:

That's it for including the library on the HTML side. Now, let's move on to the JavaScript code.
💛 JavaScript Functionality
Here's the JavaScript code to handle the conversion:

In this code, I want to turn the whole div.info-div into an image, I put it into a variable in const div = document.querySelector(".info-div");.
I also put the button into a variable in const button = document.querySelector("button");
I added a click event listener to the button so when the user clicks the button, it will follow the code inside of the event listener!
You can find similar code like this in the documentation of the html2canvas library:

What is happening here is:
We add the div (or what the element we want to take an image of) into the html2canvas([element]).then((canvas)
Added the image file type url to a variable = const imageDataURL = canvas.toDataURL("image/png"); - You can replace the png to other image file types such as jpg, jpeg etc
Created an anchor/link tag, added the href attribute to imageDataURL
The download attribute is where we will give the default name to the image file, I added "dog.png"
Perform the click() function to the anchor tag so it starts to download the image we created
And that's it!
💛 The End
And that's it! You've successfully learned how to turn your HTML into an image. It's a great way to save and share your web content in a unique format.

If you have any questions or need further clarification, please comfortable to ask. Enjoy converting your HTML into images! 💖🐼
#my resources#coding#codeblr#programming#progblr#studying#studyblr#programmer#html#html css#javascript#neocities#coding tips#html5 tutorial#html tutorial
155 notes
·
View notes
Text
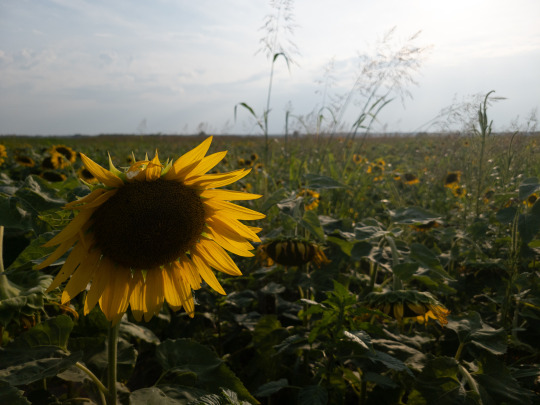
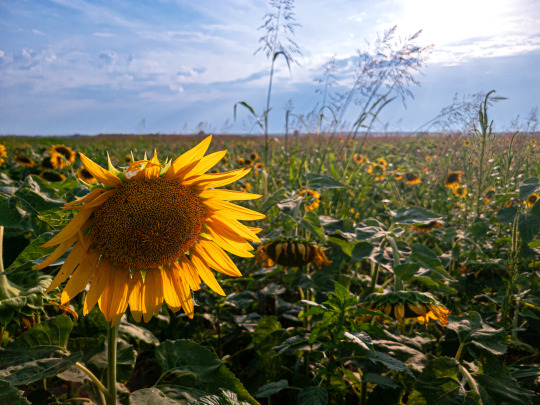
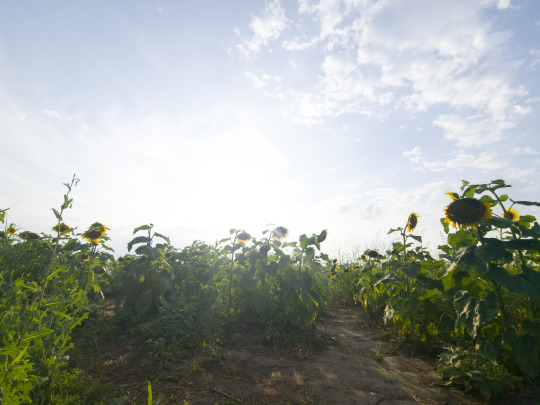

A while back on a post about a free photography course, a few people wondered if they could use their smartphone to practice.
And hopefully the above shows that you absolutely can.
Sometimes it takes a little post-processing to get good results, but that is the same with any camera. Though phone photos probably take me more than twice as long to achieve a finished product. Better cameras don't automatically make your photos better, but they do make getting good photos *easier*—especially in difficult lighting.
Many modern smartphones have a "RAW" photo mode with adjustable manual settings. Saving a RAW version of your photos allows you to continually learn and practice and return to those photos later on to re-process them with your improved experience.
A RAW capture has a lot more data than a compressed JPEG and gives you extra latitude in processing your photos. All of the editing done to a RAW file is saved in metadata instead of being baked into the pixels. So you can undo any individual change at any time without undoing changes made after that particular edit. And even if you save the file and close the program, you still have the power of undo when you open the file again.
With RAW you can more easily recover extra detail, lift dark shadows, bring back blown highlights, and restore color to blue skies that photographed pure white. (Often you can do that with a JPEG too, it just depends on the photo.)
The main downsides to JPEG editing are you can't non-destructively change the white balance after the fact, you have less dynamic range to alter shadows and highlights, and you can't make as many drastic edits before the image loses integrity.
A wise man once said, "The best camera is the one you have with you."
And a wise frog once said, "Shoot RAW and learn Lightroom because a human being can still outperform the algorithms of computational photography."
420 notes
·
View notes
Text

Owosa SPECIAL Commission OPEN
Something came up and I'm in need of some extra cash (moving somewhere else soon and other stuff), so if anyone is interested in this type of commission, let me know!
*OPEN PAYPAL ONLY
SIMPLE $20usd (Per character) CHIBI COUPLE $25usd
If you like my art think of supporting me with a coffee <3 / kofi sketchs / Normal commission OPEN
For more info, under the read more and if you have any questions, send me a message!
CAN’T DRAW: -anything that makes me uncomfortable -nsfw (extreme gore/extreme nudity/fetishes) -mecha -heavy armor *Other themes are open to discuss.
Reblogs are very much appreciated!
Info about payment and contact under the cut!
CONTACT
*Please send me amessage to let me know you’re insterested. Then please fill out this form and email it to [email protected]
Name:
Commission Type: (Sketch, Illustration, Adoptable)
Character Image References (*and background references):
Description of overall Emotion/Action:
Other Comments: *If you want the image to be transparent, tell me.
(please give a clear elaboration of what you want to commission me. I don’t work with just descriptions, Character image references are necessary).
PAYMENT and PROCESS
PAYPAL ONLY
I’ll send you a rought sketch first. One payment is recived, i’ll start working on your commission.
The drawing is still mine, I will use it for portfolio and show my art, but crediting the oc as yours. You can personally do whatever you want with the drawing, but NOT erase the signature.
Commissioned work may not be used commercially unless discussed
Files are sent via email as either jpeg or png
Also, feel free to email me if you have any question general.
29 notes
·
View notes
Note
What is your secret image processing formula?👀
What website do you find such cool VHS effects on? Are these brushes and special textures?
A magician never reveals his secrets >:) ..... okay, I'm just kidding, I can tell how I do the effect myself! :3
These first steps I do in my drawing program after drawing and finishing my doodle (program being Clip Studio Paint in my case, though it doesn't matter much tbh what drawing program to use, jfkjklhlj):
A little bit of unsharpen mask to add some sharpness on the finished image, then a little bit of gaussian blur to soften that sharpness. Sounds silly, but somehow it works, lol
After that, slight chromatic aberration. Doesn't have to be too much, it can reduce the retro look imo if it's applied too much.
Then I add some (either monochromatic OR rainbow) noise as an overlay on top of all, which then I put to like around 10-15% opacity depending on how much noise I want on the image itself. I sometimes blur the noise a little too in the end.
Totally optional and this is just something that I like to do, but I also like to play around with different wacky colorful gradient maps, trying out different blending layer-styles and trying out different effects overall. I tend to experiment a lot sometimes, lol. Sometimes I lower the saturation a bit too.
Basically unsharp mask, light blur, noise and chromatic aberration will be your best friends whenever making the VHS effect, lol.
Then after doing all that previously told; I flatten the image, save it as a heavily compressed JPEG-file (anything below 50-60% compression is good imo), and then I open it in another program, this being a free open-source program called "ntsc-rs". It's the program I use for nearly all of my arts nowadays, since I can add the authentic VHS-look with it and it's really easy to use!
If I wanna add a CRT-look then to my arts (like eg. those PS1-styled arts I've done or models etc.), I use another free cool program called "ShaderGlass"; it's originally meant for emulating the CRT look and such for PC video games, or when emulating/playing old retro games on PC. But you can open images in it too, apply shaders to them and then save the result as PNG-files!
Of course, alongside that program, I've also used few other programs and methods of making the VHS-effect: Signal-effect for Adobe After Effects (though that one costs money). Then there's also been ntsc-qt, another free program which iirc is an older version of ntsc-rs, I used to use it but it's no longer being worked on/supported so I stopped. And then also a VHS-plugin for Blender etc.
There's a lot of ways for doing the effect, but the ntsc-rs program has been one of the best and easiest one to me so far!
Hope this helped at least a little bit! <3
33 notes
·
View notes
Text
I was curious

#ok so i wanted to see first of all if i could generate a photo with random byes of an absurd image ratio#this way i also found out that jpeg has a limit of 6550 pixels for dimensions or something like that#anyway then i started going hmmm now that i generated this im curious if tumblr would allow me to upload it#and this one of 1:2^16 it did upload properly#i tried to generate one of size 1x2^20 but it broke the png specification#so i generated one of size 1x1000000 instead (2^20 is close to 1M anyway)#and tumblr does break or at least not process it well when uploading that (tho i tested it on a followless sideblog)#on desktop it just shows the default alt text [image] and on mobile it's a square gradient#also it's so fucking funny how this post is only a problem because tumblr mobile does now know how to render photos with a low width#while being on the dash.#because they do render them properly in the editor lmao#green bear spam
43 notes
·
View notes
Note
How do you nail that movie screencap effect thingamajig?? I'm a sucker for VHS-animation looking stuff but sometimes fiddling with blending modes, gaussian blur, noise, ntscQT etc. just doesn't feel right.
For me, I love experimenting with a mix of using blending modes and using ntscQT, but I definitely get the feeling of it still not feeling right despite using those methods!
I'll do my best with explaining how I go about achieving the look! The art software I use is Paint Tool Sai 2 (but any art software with blending modes + layers will do!). Apologies in advance if this is too wordy haha
1.) I draw the usual setup- a background with a character or so. I usually flatten all the layers into one but, for this case, I just only flattened the layer the character's on:

2.) I duplicate the character layer, blur it, set its blending mode to "Lighten", and adjust the opacity as needed before merging the two layers together. I duplicate again, blur again, set the mode to "Darken", adjust opacity, and merge again!

3.) (1st pic) Once I do that, I duplicate & blur the character layer again, then move it a bit to the side (any direction is fine; for this I moved it to the right). Then I set the moved layer's mode to "Color"! After that, I add a drop shadow behind the character layer to give it the look of a traditional animation cel being used.
(2nd pic) Next, I flatten ALL the layers now into one layer, duplicate it and blur it greatly + set blurred layer mode to "Saturation" & move it in any direction before merging all layers again!! lots of duplicating and merging LOL!!!

4.) OK THE LAYER DUPLICATION + MERGING PROCESS IS FINISHED FINALLY! Now we just adjust the colors!
I like to lower the Contrast and raise the Depth, though the adjustments can vary with each piece, depending on how much of a effect you want! Image on right includes the settings I used for this. (I also added a noise layer, but that's optional)

5.) And for the final step.... make the image a smaller size and save as a JPEG/JPG file!!! This should somewhat achieve the low-quality crunch look!
This step is entirely optional, but you can take the JPEG image and add it to ntscQT to mess around with different settings! Here's one I put together:

61 notes
·
View notes
Text

Out dated post!! Check out my comms here!!
I'm opening art Commissions!! If you are interested, check out my Ko-Fi here! I am offering four types of commissions as described below.
Line Art Portrait $30 (US)
Flat Color Portrait $40 (US)
Cell Shaded Portrait $50 (US)
Full Rendered Portrait $150 (US)
There are only 5 slots for now so grab them up before they are gone!
Reblogs are massively appreciated!!! <3
Standard terms:
Provide visual references of the character you wish me to draw. These may be screen shots of a game/show/etc, picrew, or illustrations from other artists. Provide an expression, pose, or vibe you would like to see the character drawn in.
Commissions are for personal use only. Give credit if posted on social media or used as a pfp or used in any way. In no way may the watermark be removed.
I have the right to refuse any commission request without having to explain my decision.
I have the right to stop/cancel a commission due to poor communication, rude or inappropriate behavior, or any breach of these terms of service. If I cancel the commission due to the previous grievances, I will keep the deposit but refund any additional payments made.
The buyer must pay the 50% down payment when the commission is requested. The rest of the payment must be paid in full when the product is completed. Upon full payment received through Paypal, I will send the full resolution jpeg to the client.
I own all rights to the work. Fanart commissions may be used by me to make prints in my shop or advertise my work. Feeding my work to AI is prohibited.
Wait patiently for your commission. It may take up to 1-2 weeks for your commission to be completed in full. You are welcome to ask for updates, but updates will be given at the sketch, flat color, and render stages depending on the type of art piece commissioned.
If you need a rushed job, an additional 25% fee is required for me to finish the piece before your deadline. Otherwise, do not rush me. I am a human being and will complete the commissions as I am able.
Process: I will send updates with a large watermark across the entire image during the sketch, flat color, and render stages depending on the commission. Upon completing the commission, you may request 3 minor changes. Any more than 3 will incur additional fees. Once the product is accepted, I will send the full resolution jpeg with a small watermark (which cannot be removed) for your use.
#art#my art#digital art#digital painting#dnd#pathfinder#bg3#dragon age#critical role#commissions#art commissions#ko-fi
42 notes
·
View notes
Text
Tried Jailbreaking my Kindle Oasis...
And succeeded!
So, this video is making the rounds and I'm not surprised because it's really well done and the Kiki cover caught my attention immediately. Since Amazon removed the option to download the books we buy I'm always ready to give them the middle finger and decided to try.
youtube
In my case the Jailbreak was a success like I said before and I'm loving KOReader (which is what I'm using now to organize and read my books). The video is simple but I did find a few bumps in the road for my device so I decided to share a few things in case anyone else wants to do this.
I have a Kindle Oasis (2019 Ver.) with the latest Firmware which for this model is 5.17.1. Please beware the updated pinned comment on the video and the warning on the Kindle Modding Wiki "Mesquio does NOT work on firmware 5.18.1 and beyond" (at least for now).
My device did update while I was trying to Jailbreak it but (I guess) due to the Oasis model being discontinued I didn't get the 5.18.1 firmware, so I was able to go ahead.
This is the wiki that explains step by step and with images how to Jailbreak the kindle and how to install KOReader. Everything is there, just read carefully. You can find your kindle serial number on the "device info" settings.
Even with careful reading I downloaded the wrong KOreader version the first time lol, is not the end of the world.
When you go to the page to get the KOReader files, if you have the same Kindle Oasis as me you need to scroll down till "Assets", click "show all assets" and then download this one "koreader-kindlehf-v2025.04.zip".
If the Installation of the jailbreak seems to not be progressing at some point you probably have to turn off airplane mode at that stage (this seems obvious but this part of the tutorial was a bit confusing on the wiki, at least for me).
The video says that the process takes 10 min, but being honest it took me around 40 because of some mistakes on my part and I spent like 5 hours just deciding what pictures I wanted for the screensavers, so depending on how tech savvy (and obsessive) you are try to set more time aside for this just in case (I spent a big part of my Saturday doing this and it kept me busy while sick in bed with a cold so this was a welcomed entertainment).
To create my covers exactly how I wanted them (filling the entire screen or at the center) I used Photopea (is like photoshop but online, it has ads on the side but in my case I don't care, they need money somehow and I refuse to use Adobe products).
I created a new file with the Kindle Oasis resolution (1680 x 1264px and 300 DPI) and then just pasted the images I wanted there, resized and moved till I was content, and saved them as Jpegs on a folder called "ScreenSavers".
This folder can then be dragged to the kindle when is connected to a computer and KOReader will be able to use it as source for the sleep screen images. This was the result:


Now, I've seen some comments about KOReader not being aesthetically pleasing but I think it comes from the first look we get from it since all the folders there look like this:

KOreader is extremely customizable though, so I just created a folder called "Home" and chose it as the default Home folder. Now every time I click the Home button it takes me to my "Library".

You can display the books in lists, grids, etc., and customize basically all the info you want them to show (or not), how many books appear pear page, if you want to order them by series, author, etc.
You can also create collections.
Honestly, the amount of customization is endless (I was playing with all the menus for a few hours, but now everything is as I wanted it and I can just read and relax).
One thing I love is that you can look up terms or phrases from a book on Wikipedia and they come with images + you can download the Wikipedia articles to read offline later as an epub.

You can also customize what info appears on the cover screen (or remove this). In my case some book names are too long and make a double line so I decided to show just the % I've read on my latest book and the battery.


You have to write the words "read" and "left" yourself, or any text you want to add. The text for what my cover is displaying looks like this:

The progress bar is also fully customizable and you can choose what to display and in what order:

There's a LOT you can do with KOReader in terms of spacing, styling, fonts, etc. Stefan Svartling has many YouTube videos showing what's possible.
Now, how do I get my books into this thing? KOReader can connect with calibre so you can wirelessly send all your books to the Kindle or connect the device to a computer with a cable and drag the books.
Where do I buy books? Calibre comes with a "Get Books" function that allows you to search from different vendors or in the case of Public Domain books it lets you fetch them from places like Project Gutenberg for free.
In my case, I'm getting new books mostly from ebooks.com, they tend to be cheaper there than on Amazon. For example, Howl's Moving Castle by Diana Wynne is 5,49€ on ebooks.com and 10.67€ on Amazon.
Please be aware, a lot of e-books are now sold encrypted with Digital rights management (DRM). This means you can only open them in certain devices and can't copy them to others. You can add plugins to remove the DRM and then send them to KOReader, but this is illegal in some countries, so always check what's the copyright law were you live.
ebooks.com has a DRM-Free (legal) category, so you can search if the book you are looking for is there.
Pros of Jailbreaking the Kindle:
All things mentioned above.
You can still access the Amazon books you had if you exit the KOReader interface.
If something goes a bit wrong you can factory reset the Kindle and it will be practically brand new, then you can re-download your books from your Amazon account.
Cons of Jailbreaking the Kindle:
It doesn't work right now on new devices with the latest firmware.
You void the warranty.
If something goes extremely wrong you could brick the device.
You could get malware if you download resources from untrustworthy websites.
If you have any questions feel free to ask!
#Jailbreak Kindle#Jailbreak Amazon Kindle#KOReader#Amazon#Kindle#resources#Amazon Kindle#Amazon Kindle Oasis#Kindle Oasis#Calibre#e-books#e-reader#Youtube#Jailbreak#Jailbreaking
12 notes
·
View notes
Text


Hey I just wanted to give you guys a little insight into several projects I'm working on.
So first of all, some of you might remember me mentioning being sick earlier this summer. I was bedridden for like 2 months, and my health has been bad ever since, getting sick again every couple weeks.
Because of that I accumulated a bit of back log of cards to edits that were released since then. I mentioned before, starting with EX5 the english twitter previews started having the "SAMPLE" text pasted on it as well, but since around EX6 the quality of the previews has also declined significantly. Despite being the same pixel size as the japanese previews, the english ones have a lot more jpeg artifacts now.
[Left a cutout of EX6 Lopmon's japanese twitter preview, right the same section from the english preview]
Working with these now increases the amount of time I need to spent on each card, which really adds up with over 100 cards per set.
Besides the current card releases, I'm also slowly working my way through earlier sets trying to enhance the cards as best I can.
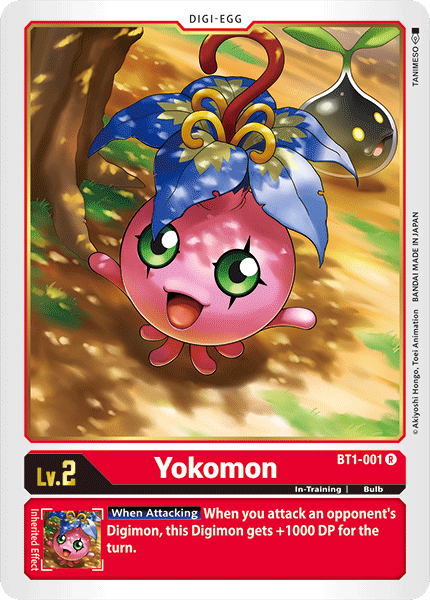
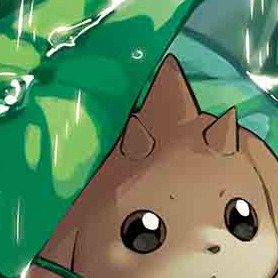
[Left BT1 Yokomon from Bandai's online card list, right my edit]
In the process I use multiple sources, trying to find the highest resolution I can find for the image and do color corrections if necessary. I also decided that instead of favoring "authenticity" I'll favor legibility, meaning I will paste in keywords I sourced from higher resolution cards, and in some cases retype the effect text entirely.
This is a very slow process, and is lower on my priority list so the progress is not very far. My goal is a complete library of all cards.
Another thing I'm working on is the Un-Dub Project, which I had previously introduced to you before.
I plan on assembling my edits in "packs" so people can decide themselves how much change they want. This will include the options from my original poll as respective levels, as well as a Tamer Pack.
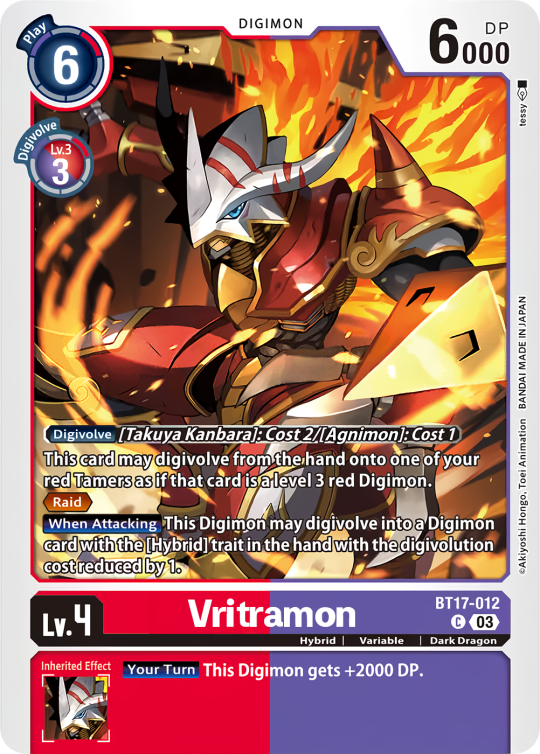
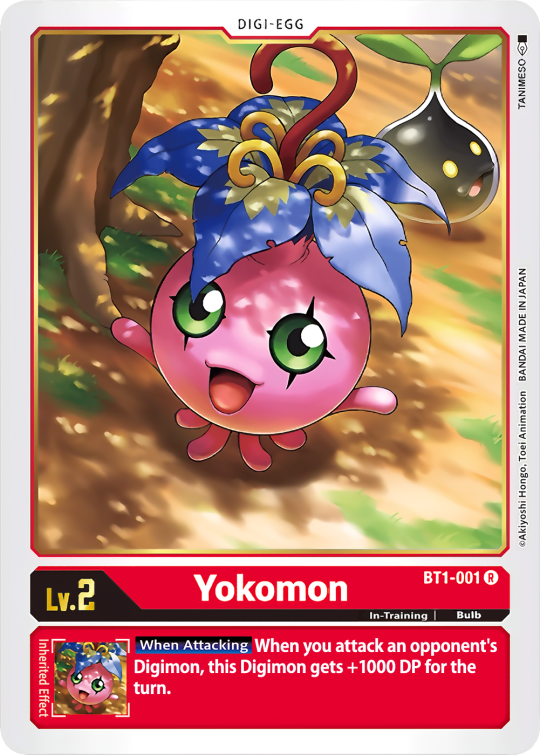
[Left BT17 BurningGreymon, right my edit changing the names to Vritramon + Agnimon]
People will have to mix and match at their in discretion, being aware of card interactions etc.
Next is a bit of a smaller project, the Errata edits. Most cards that got Errata had their already fixed versions released as previews, but are printed incorretcly. Some however got their Errata after the preview releases, in which case I'll edit the card text accordingly.
The official card list will have the correct text, but those have very low resolution.

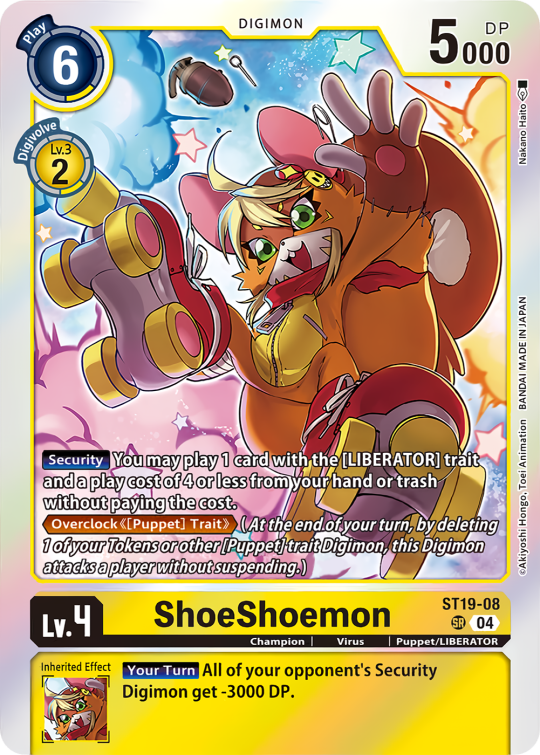
[Left original preview of ST19 ShoeShoemon, right my edit with text errata]
When releasing the Errata pack I'll include Errata cards that I didn't edit as well, in order to represent the full list and not cause confusion.
Finally I have a little passion project of doing edits of all cards with <rule> updates.
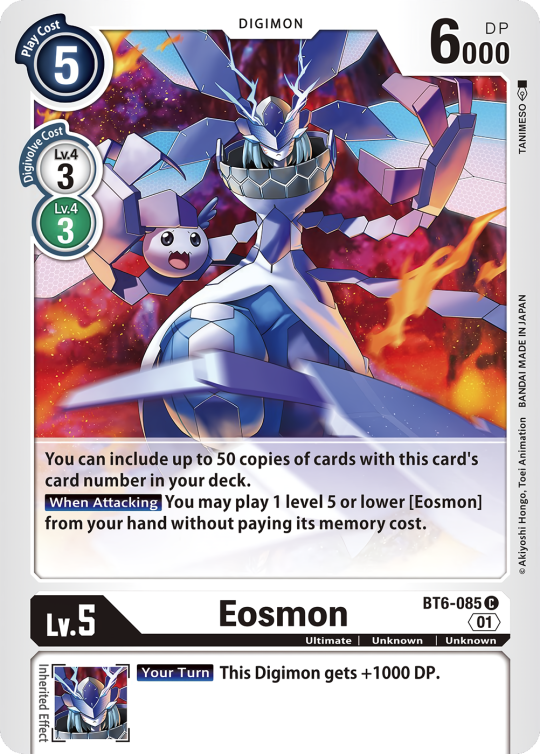
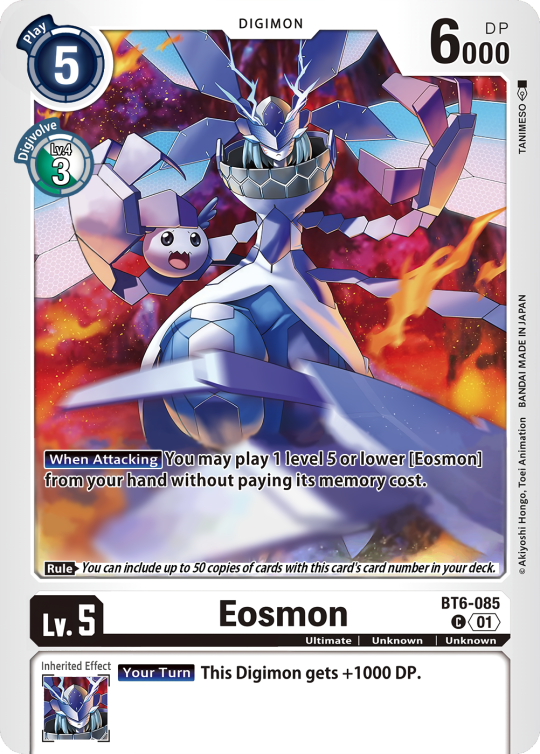
[Left BT6-085 Eosmon, right my updated rulings edit.]
This is gonna get a little technical, so bear with me. As per the rules Effects don't trigger in the breeding area. Before the <03> card layout revision, additional rules were included within the effect text. This resulted in card interactions not working as intended.
For example, BT11-063 Geremon has the effect "The name of this card/Digimon is also treated as [Numemon]."
But going by the rules, this would not be in effect in the breeding area, so for example Numemon X, which can evolve from Numemon, would not be able to evolve from Geremon in the breeding area.
With <03>'s introduction of the <rule> box, this was fixed, and some cards have been revised with this new <rule>. But as always, no reprints.
This is the edit-heaviest of my projects, as I felt inclined to not slap the <rule> box on there, but remeake the entire card in the new layout style to go along with it.
#digimon#digimon tcg#digimon card game#digica#デジカ#digisafe#lov speaks#blog update#personal#digi lov edits
33 notes
·
View notes
Text


Have some doodles and drawings I did on my school computers notes app yesterday!
Took a bit to figure out how I’d get these onto my phone- My art app doesn’t accept .pdf’s or .jpeg’s so I had to get it onto my drive and there was this whole process and-
Next class is about to start-
Yeah just take ‘em. Sun’s wearing his cool pants in the first image :D
#tsams#sun and moon show#lunar and earth show#laes#tsams sun#tsams moon#tsams au#late born sun au#bring back laes#bringbacklaes#Justice for laes#my art
44 notes
·
View notes